Showing posts with label gui. Show all posts

Tuesday, September 4, 2012

Smart, Git and Easy

 Here’s a great program that my friend Andy from openSUSE turned me on to that makes handling Git that much easier than typing at the CLI (Command Line Interface). Many Linux users are already familiar with Git, but for those who aren’t, Git is a nice revision control sharing system. A host is used as an interface for the commands and in a similar fashion as Google Drive or Dropbox, files are moved in and out. Git provides timestamps to each file as it is accessed, or in Gits case pushed into the host or pulled from the host. This file sharing method makes collaborating on a single file or a multitude of files that much easier to track so everyone involved with the file can tell which file was updated last so there is no confusion. At least this is my jist of Git.

 SmartGit is a really nice GUI for taking place of doing Git commands from the terminal line. I grew up in the pre-GUI age long before Windows was invented and spent years and years working from the command line. To be honest, if I never had to use one again would be ok with me, but as most Linux distros and programmers have not fully reached a point of escape from command line operations, sometimes we need to go there. Thankfully there are programmers who think like I do and work their magic on projects like SmartGit to eliminate some of the old CLI usage.

 I would have preferred SmartGit to be a little easier to get setup, but a couple of good articles via Google search and it can be done fairly easy. It downloads as a tar file but doesn’t get extracted and installed the same way most would. Instead, the files simply get extracted and then some modifications have to be made. If it weren’t for the fact that this software came highly recommended by someone I trust, I might have looked for an easier alternative or gave in and went by command line, but I kind of like a challenge anyway.

The first thing to note is that this GUI is dependent on the Java Runtime Environment, so make sure it is installed on your computer or at least have the file available. We are going to have to know the path to the file and paste it into one of the SmartGit files so it knows where to get it from.

This is the file we will need to open with our text editor and put in the path to our JRE.


Next, with text editor of choice, insert the path location into the file and save it. It should look like this.


Now all we have to do is run it and then add a launcher so we don’t have to initialize from the command line all the time. Open a terminal session and switch to the directory where SmartGit has been extracted then initialize it like a C++ program (or similar) like this.


If for any reason SmartGit does not initialize, go back and make sure the path to the JRE is correct and all terminal entries are correct. If all went well then we should be looking at the SmartGit start screen. To install the quick launcher just repeat the steps in the terminal but this time use the add-menuitem.sh file and it will put an icon on the desktop for you.


On the initial start up, there will be an option for where the Git account to associate with is located. This is something that will either be already set up or will need to be. The rest is to just select all the default values given. Once all that is done, then just work your way around the interface and relax because all those typing lines just became simple mouse clicks. Fast, fun and easy just the way we like it. : ) 

REMEMBER: Git is best used for programming files when revision control is really important. It CAN be used as a replacement for Google Drive or Dropbox, but it’s not recommended and even the GitHub website states that it is NOT intended to be used in the same capacity, hence the reason they only allocate 1G to each account for free. 

Sunday, February 19, 2012

Open Graphics Drivers

So this is my first post in this How-To section. In this post I just wanted to go over a small driver situation I went through just recently. For everyone out there who runs open source (Linux) and also has an Nvidia graphics card, you have probably heard of the Nouveau driver. Nouveau is the default open source driver used on most Nvidia cards. It is possible to follow a lengthy procedure to switch to the proprietary drivers from Nvidia and there are things that can go wrong during that process. In this how to, I'm going to cover one of those possible issues and what I did to get through it for OpenSUSE 12.1 x86 64bit and a Nvidia GeForce 9800GT card.

The instructions were rather simple to follow. Just open a terminal, become root and run a script to verify your graphics card. After verifying what card you have to determine what driver you'll need, use zypper to to open the 11.4 repositories and download the driver. The instructions then say to simply reboot your system and that is it. Well I'm here to say that I think a step is missing here because it wasn't quite that easy for me. Maybe those instructions were just a bit too simple?

When I reboot my computer, my default GUI wouldn't load and I ended up with only the CLI screen. I did a Ctrl+Alt+Del from here and tried again. Yep, same thing, no initialization into the GUI. This is when it's nice to have other computers in the house. I turned on the laptop and Googled “OpenSUSE won't initialize” and found the instructions I needed. Remember, these instructions are based on how I did it. Not that this is necessarily the right way, but it worked for me so I thought I would share it so maybe it could work for someone else.

I initialized another reboot and this time interrupted the process, similar to if someone were going to go into BIOS, and selected Failsafe Mode. This is of course the reduced graphics and minimal driver installs just to do very basic repairs when things go awry. Once I saw that small fraction of my desktop come up, I managed to work my way over to YaST and get into the boot loader options.


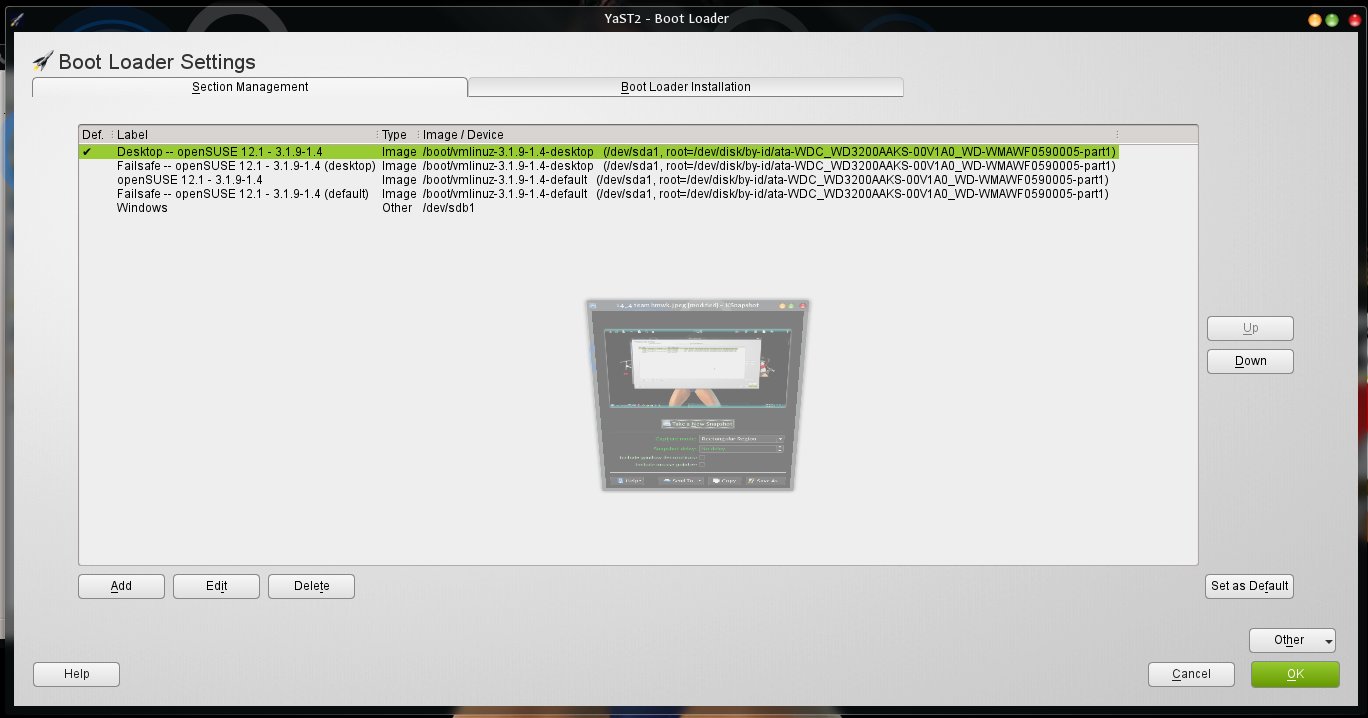
This area is where we configure what profile the OS is going to boot into. Say for instance, we wanted to change what turns on and what doesn't at boot. This is the area where the administrator goes to do that. We can set various sets of different profiles depending on what we want to do or don't want to do. In this particular case I wanted to switch the default boot profile from Desktop to Default. The Default kernel is optimized for running a server such as if I used my LAMP stack for more than just web design  and development testing. Desktop is a copy of the Default kernel but optimized for desktop usage that is used on a day to day basis so that if something does go wrong, like it did for me, we can always fall back to the Default desktop and copy it over to Desktop again deleting the old files.


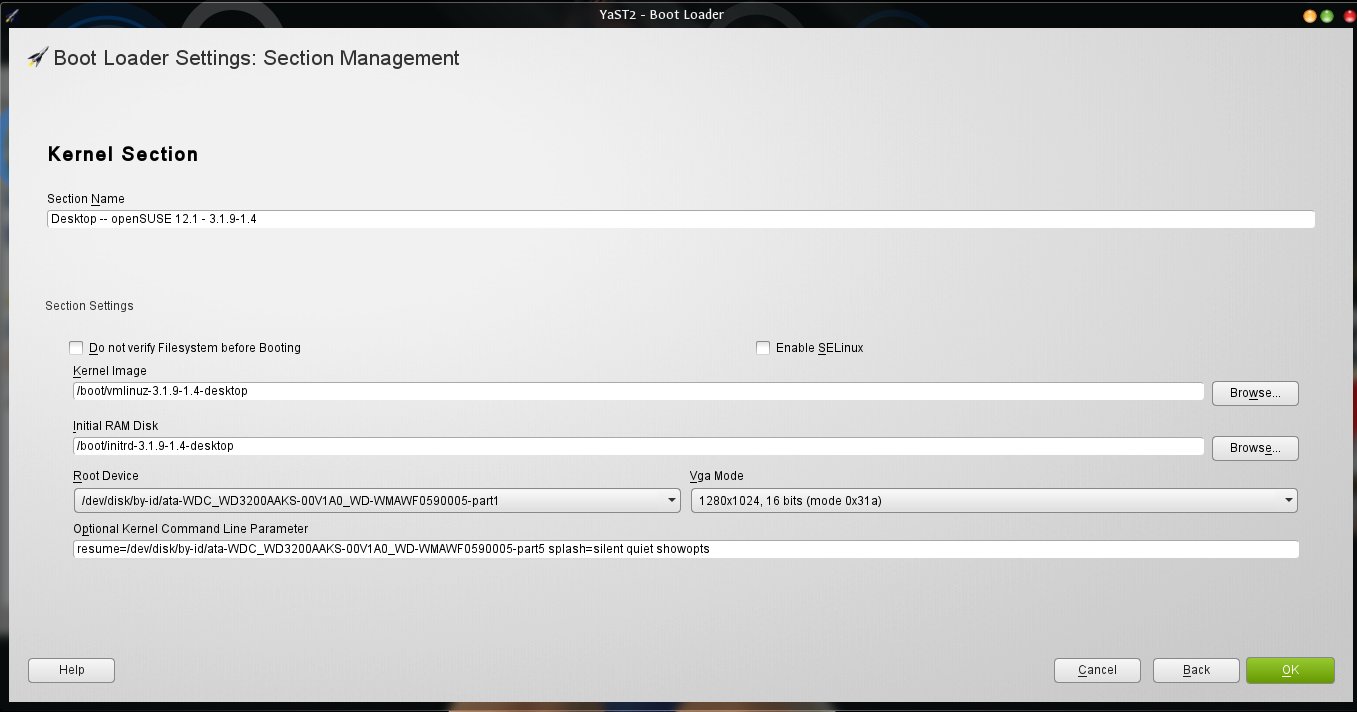
In picture number two above, we see what gets initialized during boot for any given profile. Once someone has switched to the Default profile as the the default loader as done in the control panel shown in picture number one, there should load a GUI with a resolution that can actually be worked with. Go into YaST again and go into Boot Loader and then into Manager. In this screen we see where the boot files are kept and what we need to do to copy all the relevant data from Default into Desktop then rename it Desktop. Later we can go back and rebuild the desktop profile correctly, but for now we just want something to run on without it being the only good profile available just in case again. Once the old Desktop profile has been replaced with the Default profile boot configuration, then it's just a matter of going into the actual boot file and copying and renaming.


In picture number three above is just an idea of where someone is going to find the boot file with the data we are going to have to work with. This is the root file structure where everything starts for our Linux system. It's fairly easy to navigate once a person gets used to working with it. I hear people at the University I attend call Linux a CLI operating system. I suppose when set up for basic server operations it could be, but I have gone through the route of learning grep and it's kind of a pain in the butt. It is very similar to the old days of having to navigate a computer. A lot of cd/ or /.. or li and all those goofy commands instead of drag and drop and navigating around with a GUI.


Picture number four above shows the boot file system. What we want to do here is of course make copies of everything and set them aside just in case. A flash drive or external drive or something not on the same hard disk as the original OS runs from. Once copies are made, what I did was to delete each file that had -desktop in it and replace it with a copy of the default file renamed to the same as the original desktop file. Now like I said before, this may or may not be the right way of doing this but, this is the way I did it in a pinch and it's been a few weeks and I'm still running good. Yes, the proprietary drivers did end up being installed.


If these instructions work for someone else or helps them out that's great! That's the fun in sharing experiences and writing these How-To's. If someone does find themselves in this situation and does get it running again, make sure to report your experience to the people over at OpenSUSE and get their feed back. There are teams of really cool people there who are all volunteers and provide support better than most paid services would. I have yet to drop this scenario of what I did on them but, when I do I will update this post with their thoughts and comments. In the meantime...

Happy safe computing!